Monday, November 22, 2010

Support artists in your community


I'm a blog slacker! I just popped over to my blog and realized I haven't written since the end of August. I always mean to get here but it hasn't worked out much this year. I am much more active on the Pigeon Road Pottery page on Facebook. If you are a Facebook user, please connect to me there. I am on there regularly with lots of photos of my work in progress.

Change is in the air and I have a lot to talk about. I will be paying more attention to this blog after the holidays. I know I've said it before but I do mean it. So have patience with me.


Above is a poster for my upcoming show on December 11th. If you live in northern Wisconsin we'd love to see you. If not, I urge you to support the local artists in your community. At the top of this post there is a collage that includes my work along with pieces by some of my favorite artist friends. The artists are:

Top row (left to right): Roberta Polfus, Emily Murphy-Bicking, Gary Jackson & Kathy Furda. Bottom row: Katlyn Koester, Amy Higgason, Wendy Powalisz & Debra Ketchum Jircik.

Happy Holidays!

Monday, August 23, 2010

Summer work

A great summer is winding down. I plan on writing a very personal post soon about what went on here during the last few months. Until then, here are some quick studio shots of pieces I completed recently.


I made a series of 8 of these small pouring vessels. There is only 1 left.


Two tight detail shots of the platter featured in my March 17th blog post titled "Coming Attractions".


Another intricate carved platter.


This is a large covered casserole. I was very happy with the glaze and carving results.


This small pitcher sold during the Northwoods Summer Art Tour.


This pouring vessel was snatched up by worthy patrons at "Art In The Yard" – Summer Solstice edition.

All the rest of the photos are new pieces from my black & brown illustrated series:


A covered jar from 3 angles.


My friend Lisa bought two of these to use as "wine cups".


Another covered dish.


Ohh, I have a thing for turtles.


I also dig butterflies...


and howl at the moon!


Another turtle.


You can view the steps I took decorating this platter in an earlier post from April 16th. That blog post sold this platter. Someone came to see it and buy it during the Northwoods Summer Art Tour.

I've made a lot of work I am proud of over the last few months. I've also taken more time away from the studio than usual this summer. Watch for a post soon entitled "Priorities & Potential". I am still forming it in my head. Once it goes live, I will be anxious for your comments.

Thanks!

Amy

Tuesday, July 20, 2010

News and an apology

I have been gone from this blog since April. I am full of legit excuses, but I will save them for another day. Instead, please accept my apology for being lax. If you are a fan of this blog I will be sharing new photos and thoughts very soon. I appreciate your patience. For now I have two quick pieces of news to share.

A sample of a new ceramics book that features my work in just arrived in my mailbox. I was invited to be part of the photo gallery of "Ceramics for Beginners: Surfaces, Glazes & Firing" by Angelica Pozo. It is for sale on August 3rd. I have two pieces in the book. I can't tell you how cool it feels to have photos of my work on the same spreads as Silvie Granatelli, Sandi Pierantozzi, Ruchika Madan and friend Kate Biderbost among others.


News item #2: It's Northwoods Art Tour time. If you are in the area this coming weekend please stop by my studio on Fri, July 23, Sat, July 24 or Sun, July 25 from 10am to 5pm. I'll have lots of new pieces in both glaze series I work in. Guest artist Katlyn Koester is also showing her pots and we'll be doing demos and acting silly all weekend (promise!). Plus,... I am giving a piece away as a door prize. For more information visit the tour website at Northwoodsarttour.com

Thanks for being here. Check back soon for photos of my summer shows, new work and news from Pigeon Road.

Thanks,
Amy

Friday, April 16, 2010

What I did today

This afternoon I decorated a platter. It is the first brown & black scraffito piece I have done in over a year. It was really fun to get back into it.


I started by cutting out stencils of a bird and 2 butterflies. When I've made stencils in the past I used clear plastic. Old clay bags work great for stencils because they are a heavy weight plastic. This time I tried tracing paper for the bird on a branch. Both materials worked fine. The benefit to the plastic stencils is they can be reused. I wet the stencils (this helps them stick and stay put) and placed them in position on the leather hard platter. Then I centered the platter on my potter's wheel.


Next as I slowly spun my wheel, I used a soft wide brush to apply the brown and black underglazes over the whole surface of the platter. I used Amaco LUG1 black underglaze and Mayco UG031 Chocolate underglaze. The stencils blocked out the areas I wanted to remain white. Clay slips work just as well with this process.


After the underglazes dried to the point of loosing their sheen, I peeled the stencils off.


I used my spinning wheel and a fine wire loop tool to cut some white lines into the black rim of the platter. My next step was to add more black plants on top of the brown background. I did this freehand with small brushes.


I let the piece dry for about 1 hour. Then I used my fine wire loop to carve through the layers of underglaze and reveal the white clay underneath. This technique is called scraffito. After this piece is bisque fired I will apply a clear glaze and fire it again to cone 6. When it is completed, the brown underglaze will turn a honey color and the black and white areas will be glossy. You can see examples of finished pieces using this technique in many of my earlier posts.


On Saturday I have two more platters to decorate. I haven't decided what I am going to do to them yet. Stay tuned...

Monday, April 12, 2010

New casserole

This post previews another new piece that I documented step by step as I worked on it.


Someone commented on my last post that they wanted to see my tools. This is a shot of the 5 tools I used to carve and stamp on this pot. From left to right: a metal stylus with small ball tips on each end; a Kemper wire loop cutting tool; a fine wire tool I use for drawing lines; a broken off TV antenna I use to "pebble" a surface; and an old burnisher from my "pre-computer" graphic design days.


Here is the piece pre carving.


This time I broke the bottom into 5 sections and carved or pressed a texture into each.


I worked on the piece upside down on the banding wheel and my lap. The lid is safe under plastic.


I decided to draw pods & plants around the entire upper half of the piece. I used the fine wire tool to draw the plants. It is the same tool I use when I do scrafitto decoration.


I made the handles by rolling small clay coils over a corrugated cardboard to pick up a lined pattern. Then I flattened the underside of the coils on the table.


After tracing the outline of the handle in position I scored each surface with a knife before attaching them.


I used my finger to mold the underside of the handles into a graceful curve. The lid is still not carved.


A top view of the lid with carving, sprigs and the knob in place.


I also added sprigs to the sides of the handles.


A detail shot.


The finished piece.

Friday, April 2, 2010

Evolution of a form

The pieces I am working on right now are very time consuming. At the rate I am working it is going to take me a long time to fill my kiln. So for now I am posting photos of pots in the leather hard and greenware stages. It has been really helpful for me to document the stages these pieces go through. I like looking at them without color.

Most of the time I don't know how I am going to alter a piece until I do it. I look at the form, turn on some loud music and just dig in. For me the process is very improvisational. I make it up as I go.


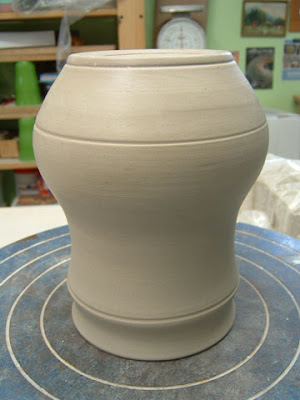
Here is a "blank" covered jar. It has been trimmed and is at a firm leather hard state.


I decided to start carving at the bottom of the piece. I work on pots upside down all the time.


I was able to carve the continuous spiral by using my banding wheel and a small wire loop tool. I used the corner of a square wooden drawer knob to pierce the bottom foot in 5 places.


Next I moved to the lid. I used two wire loop tools to carve the outer pattern. Then I used the round end of a broken off TV antenna to hammer the pebble pattern. It seemed like a good idea to pierce the rim of the lid in 5 places too.


I liked the 5 cuts in the rim and the foot. That lead me to divide the jar's middle section into 5 sections too. After that I decided to create vines. The cuts echo the pattern on the lid.


I used a fine wire loop tool to refine the edges of the leaves. Next I decided to pick up the pebble pattern over the surface. The vines popped out as a result.


These are small clay spirals. I made them by pushing clay balls into a little bisque mold of a button.


I scored the surface of the pot with a knife before I applied the clay spiral. The underside of the spiral is scored too. They are joined together with distilled white vinegar (which I prefer to slip).


I threw 5 different knobs so I would have lots of options. I will use the extra knobs for other pieces.


After looking at the jar with all 5 knobs I choose this one. Here is the completed jar with the knob in place.


A top view.


The textures look gorgeous at this stage while the clay is still leather hard.